
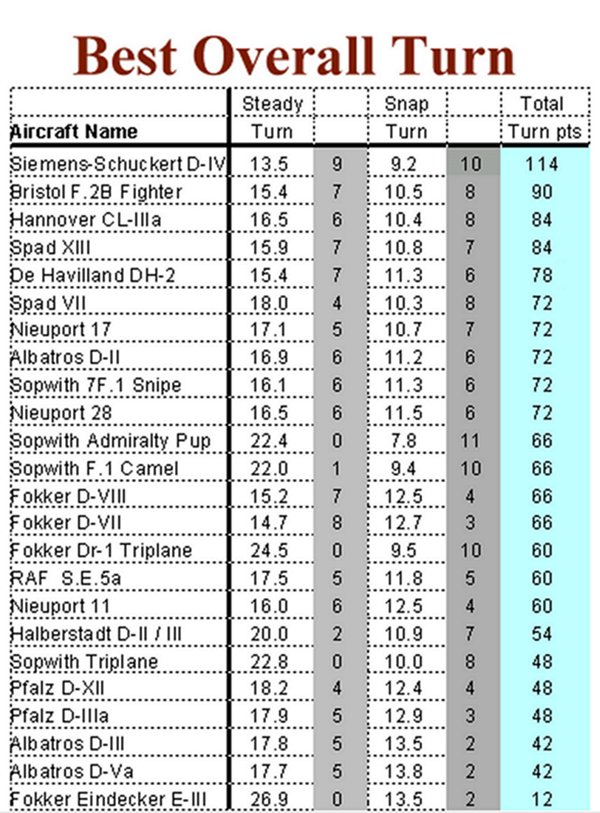
Tactical Turning Ability of Selected WW I Aircraft |
scroll down for notes on the research, and how to read the table |
Research Notes: 1. Source: Rodgers, Russell. Comparative Analysis of Leading Aircraft Used on the Western Front During World War I. Manassas, VA: American Military Univeristy, unpublished study, 1999. Data to be republished only by permission. 2. Methodology: it is not my intent to reproduce that here, but a basic overview of the methodology involved analyzing the aircraft using engineering and empirical methods. In this I am indebted to Jack McCracken for his assistance. A spreadsheet table was created for each plane, and the appropriate data run through the formulae. Performance indicators were cross referenced to anecdotal accounts and performance tests conducted by the Royal Flying Corps / Royal Air Force. For example, one can see that the Albatros D.II's snap turn is almost identical to the DH2's, thereby explaining how Richthofen was able to turn with Hawker during their famous dogfight on Nov. 23, 1916. Yet, one can also see that the DH2's steady turn is over one second superior to the Albatros, thereby demonstrating that Hawker may have erred in his engagement method with Richthofen by relying on the snap turn. Furthermore, the DH2's steady turn is superior to the Halberstadt D.II's, explaining how a group of DH2s from No. 24 Sqn were able to outmaneuver close to twenty of the Halberstadts during an engagement on Oct. 26, 1916. The RFC communique offers a hint as to what happened, by pointing out that "though superior in speed and climb, the Halberstadts appeared to lose height on the De Havillands while turning. The De Havillands were thus able to out-manoeuvre (sic) them." (RFC Communique, Oct 26, 1916). The data has proven to be consistent regarding both engineering and empirical / anecdotal data. Finally, the data demonstrates that the Fokker D.VII did not have the violent turning ability often attributed to it in some anecdotal accounts. Instead, its greatest strength was in the steady turn. In this way, the D.VII, using superior climb with the BMW engine, could tightly circle above the enemy before diving down on them. This became the prefered German tactic of attack in 1918. When a group of D.VIIs (with Mercedes engines) attempted to engage two Bristol Fighters in May of 1918 (the famous "Two against Twenty" episode... see the entry for the Bristol Fighter for details), they were severely handled because the Bristfit could out snap turn them, and even hold its own in the steady. 3. Steady turn: seconds to complete a 360 deg steady turn A steady turn was one performed where the aircraft maintained altitude 4. Snap turn: seconds to complete a 360 deg snap turn A snap turn was one performed where the aircraft rolled onto its side, and lost altitude in the process. 5. Total Points: the aircraft's ranking in a tabulated scale. This is a function of both types of turning ability. 6. Numbers in the grey columns are quality pts for the rankings in each category. 7. Naturally, these figures are approximate estimates, and do not take into account the special flying abilities demonstrated by some pilots to get more performance from their aircraft, at the cost of pushing structural limitations. 8. Finally, not every aircraft featured on this site are referenced here. However, most are. |